...Unique Creative Styles and Content For Animation
Links
Exporting A .STL File Using Ticket01’s Maya Plugin
After you have gone through the preparation steps for your model. there’s one more important step to take care of: smoothing and exporting the Model and then contacting your local Print-Bureau...
Part 3: Smoothing the Model
When it comes to StereoLitography, know that, “what you see is what you get”: if your model is not smoothed - meaning that if your model is in level 1 (faceted,) you will get a a faceted print! So what we need to do is smooth the mesh, and know that because StereoLitography’s resolution is hardware-dependent - based on the printer’s resolution, you can smooth the Model to your heart’s content!… but don’t go crazy or the file won’t open…
Step 10
Select the Mesh(s): if there are multiple Polygonal pieces, Combine them together (Polygons / Mesh / Combine)…
Step 11
Select the Mesh and Hit 3 (Smooth Preview)…
Step 12
Go to Modify / Convert and select Smooth Mesh Preview To Polygons. This will “convert” the Smooth Mesh into a Subdivided polygon Mesh with a higher Polygonal count - to preserve the smoothness…
Step 13
Smooth the Mesh once by going to Mesh / Smooth Options. In the Division Levels’ Attribute Box enter 1…
Step 14
Next we will smooth the mesh one level at a time until we get “enough” Subdivision. In my case, I made another Smoothing pass. What you want is to have enough Subdivision to get a smooth Print, but not too much so that the file won’t open!. Here are my results:
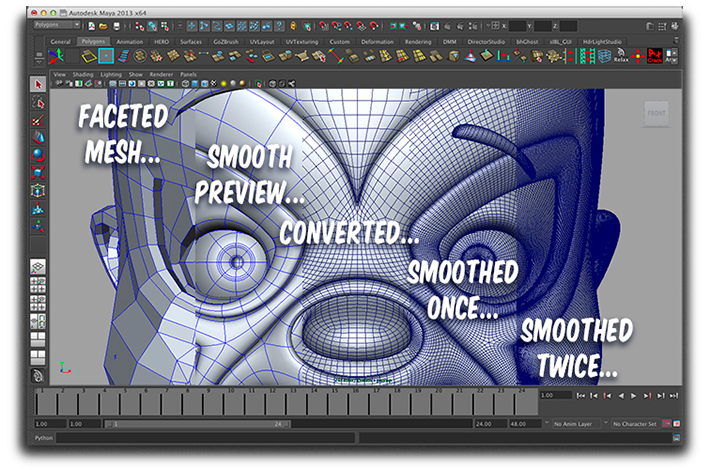
If you look near the ear area, you see so much Subdivision that you can’t see a grid-pattern anymore: STOP THERE!...
Part 4: Export the Smoothed Model
The plug-in(s) from ticket01 can be found atop the Main Menu. However, we won’t deal with the plugin from the Main Menu, but from the Export Options…
WARNING: The file that we will export MUST be either a Maya ASCII or Binary.
Step 15
Select the Mesh…
Step 16
Go to File / Export All - OR Export Selection’s Button…
Step 17
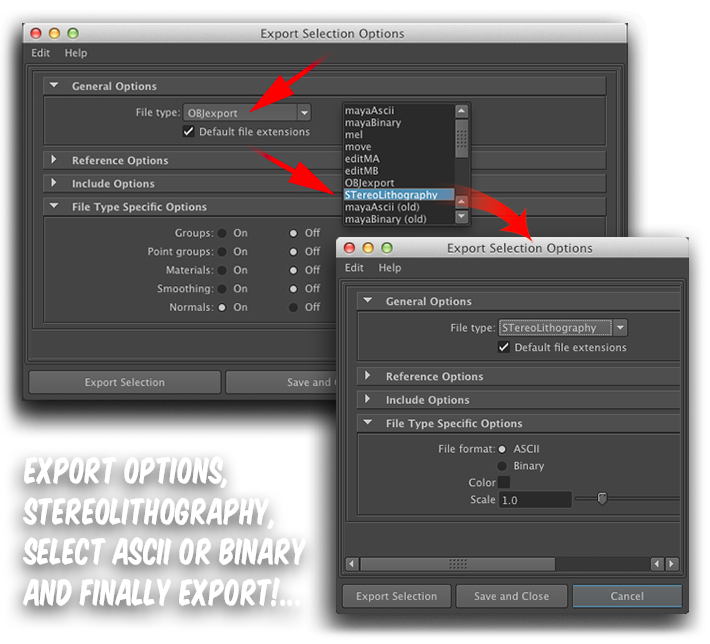
Choose STereoLitography from the drop down box...
Step 18
A new window pops-up. From the File Type Specific Options, Select the file format ASCII or Binary…
Step 19
Hit Export…
Part 5: Contacting your local 3D Print-Bureau
After exporting your .stl file, all you have to do is locate a Stereolithography Printing Bureau in your area and email them the file for a quote…
I use with Purple Platypus, a local shop directly associated with the company that manufactures the Object 3D Printers they use, Objet Geometries.
NEXT: Printing the model and what to expect!…